Conical Fermenters and the Yeast Crop
A conical tank earns its keep twice: once by letting trub and yeast settle into a single point, and again by making that yeast recoverable for the next batch. HGMC publishes conical fermentation tanks for beer, cider, kombucha and wine, with jackets on the body and the cone and a headspace designed around the working volume.
Key takeaways
- The cone concentrates yeast and trub so they can be dumped or harvested instead of carried through to packaging.
- A racking arm placed above the cone junction lets beer be drawn clear of the crop.
- HGMC publishes jacketed conical tanks in stainless steel 304 or 316 with TIG full welding and polishing to 0.4 micrometres or better.
- Harvested slurry can be repitched, which is the main cost saving a conical tank offers a working brewery.
Why the cone shape does the work
Fermentation produces two things you want out of the beer: yeast that has finished its job and trub carried over from the kettle. In a flat-bottomed vessel those settle across the whole floor and are difficult to remove without losing beer. In a conical tank gravity does the collecting, moving solids down the sloped walls into a small area at the bottom, where a single outlet takes them away.
The cone also adds hydrostatic pressure at the bottom, which helps the yeast compact into a thick slurry rather than a loose, beer-filled sludge. That matters for harvesting, because a compacted crop is easier to store, easier to measure and less likely to carry oxidised beer into the next fermentation.
Shape alone does not finish the job. A tank with a shallow cone empties slowly and leaves a shoulder where yeast sits; a very steep cone costs height that many rented buildings do not have. The practical compromise is the cone angle you can transport, fit under the roof and still crop from comfortably, which is a conversation to have with the supplier while the drawings are still open.
Fittings that decide how well cropping works
Three fittings carry the daily workload. The dump valve at the bottom of the cone removes the first, heaviest fraction of trub and dead yeast. The racking arm draws bright beer from a point above the cone junction, and it should be adjustable so the draw point can be raised or lowered as the tank empties. The sample or carbonation valve on the body lets a brewer check gravity and condition without opening the tank lid.
The position of the racking arm is set when the tank is fabricated, so it is worth specifying against the size of the crop you expect rather than against a generic drawing. A brewery that ferments to a high gravity and crops heavily will want the arm higher than one brewing a lighter, faster beer.
Dumping, cropping and the working week
| Task | When it happens | What it needs |
|---|---|---|
| Dump the first trub | Within a day of the yeast being pitched | Bottom valve with a short, straight outlet |
| Crop the yeast | At the end of primary fermentation, before cooling down | Clean, sanitised container and a steady hand |
| Draw bright beer | After the crop is taken and the beer has settled | Racking arm set above the cone junction |
| Dry hop or add fruit | During the later part of fermentation | Access port clear of the cone and the sample valve |
| Clean and inspect | Between every batch | Spray ball coverage and a polished internal finish |
The order of those tasks is not arbitrary. Cropping before the beer is cooled gives the yeast a healthier start in storage, and drawing beer only after the crop has been taken keeps the racking arm clear of the solids it was designed to avoid. Skipping the early trub dump is the mistake that shows up later as a slow filter or a harsh flavour.
What a good crop needs from the tank
Yeast health is decided by temperature and cleanliness as much as by geometry. HGMC publishes specially designed jackets on both the body and the cone, which lets fermentation temperature be held through the final, slow part of the process when the tank is mostly cone and mostly yeast. A tank that can only cool the cylindrical wall will run warmer at the bottom, and that is exactly where the crop is sitting.
Cleanliness is the other half. Vessels are fabricated with TIG 100 percent full welding joints, polished to an accuracy of 0.4 micrometres or better, in stainless steel 304 or 316 with 3 mm and 2 mm plate thickness depending on the part, and the SUS304 food-grade material is certified by SGS. For a brewer, the point of the finish is that yeast does not stick to it, so a crop taken from a smooth tank is cleaner than one taken from a tank with rough welds and beer stone.
Worked example: tank count and yeast arithmetic
Assume a 1,000 L batch brewed 10 times a month, with primary fermentation plus cleaning taking 10 days per tank, which is 3 batches a month from each vessel. Ten brews a month divided by 3 batches per tank comes to 3.4, so the cellar needs four tanks to keep the brewhouse moving without waiting. Those answers only hold for the stated assumptions; a longer fermentation or a slower clean pushes the count up.
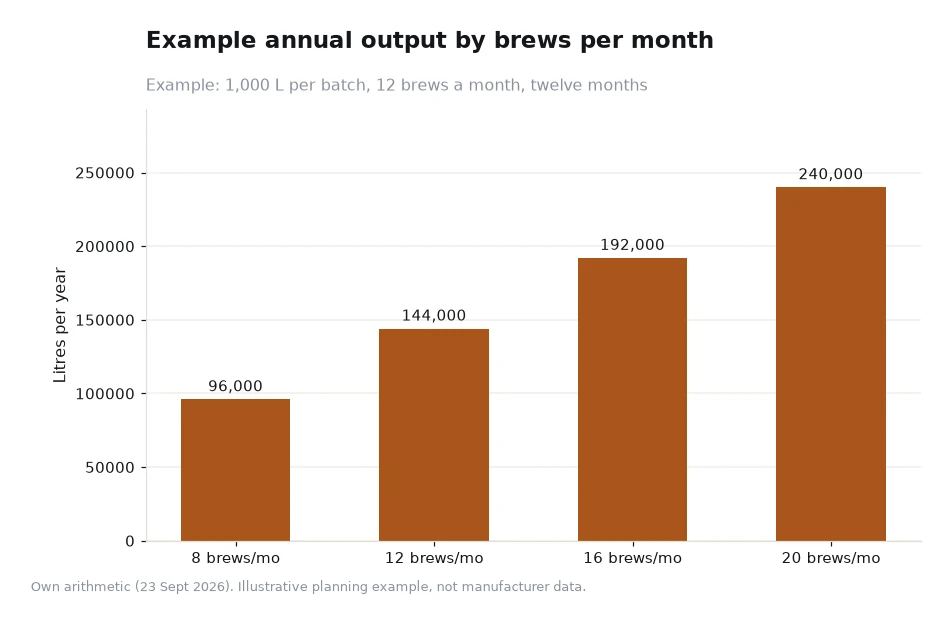
For the crop, assume a 1,000 L batch yields about 15 L of thick slurry, roughly 1.5 per cent of batch volume, and that a pitch of 1.5 L of slurry is enough for the next 1,000 L batch. Fifteen litres divided by 1.5 L per pitch is 10 pitches, so one batch can seed ten more if the yeast is handled well. The same tank capacity brewed 10 times a month gives 120,000 L a year, or about 1,026 BBL at roughly 117 L per barrel. Both calculations are illustrative examples rather than manufacturer figures.
Frequently asked questions
How much yeast can be recovered from a conical tank?
It depends on the beer and the crop, but a working illustration is a 1,000 L batch cropping about 15 L of thick slurry, which is roughly 1.5 per cent of the batch volume and enough to pitch about ten further batches at 1.5 L each. Those are our own example figures, not manufacturer data.
Where should the racking arm sit?
Above the junction where the cone meets the cylinder and clear of the yeast layer, so beer can be drawn without pulling the crop with it. HGMC publishes conical fermentation tanks with jackets on both body and cone, and the racking arm position should be fixed on the fabrication drawing rather than improvised on site.
Specifying conicals that pay for themselves
Decide three things before ordering: the cone angle, the racking arm height and the number of tanks the brewing schedule actually needs. Then check that the room can take the height, that the floor can carry a full tank, and that a container for cropping can be placed under the bottom valve without a ladder. The brewhouse equipment pages show how fermenters sit alongside the hot side, and the brewery system pages group the vessels into complete packages.
Smaller breweries usually start with fewer, larger tanks rather than many small ones, then add capacity as the schedule fills. The published micro craft brewery packages include conical fermentation tanks and bright tanks together, and the wider Brewing Equipment listing covers the filling and support machines that finish the job.
Jacket arrangement, fabrication details, tank types and material specification quoted here come from the manufacturer's own website, read 23 Sept 2026; the tank count, crop and output figures are our own labelled examples. [1]